
Pinnacle Complete Paint Care System
You've spent plenty of money on the purchase of your car or truck, now the question arises, "How do I take care of it?". The answer is vital to retaining the value of your vehicle and reducing future costs.
This article will help walk through the Pinnacle Complete Paint Care System of washing, claying, polishing, protecting and the final maintaining processes step by step. Don't worry, it's pretty easy and you don't need to be a detailer to do it yourself!
- Wash Thoroughly wash your car to remove loose dirt.
- Clean Clean your paint with detailing clay to remove bonded surface contamination that is stuck to the paint and is not removed with normal washing.
- Polish Remove defects in your paint, staining and enhance overall shine.
- Protect Protect the paint surface from harsh environmental elements and prevent premature aging with a wax or paint sealant.
- Maintain Maintain your paint with normal washing and quick detailing in between washing.
STEP 1 - WASHING YOUR CAR
The car washing process can range from those who religiously wash or quick detail their vehicles daily, to those who love caring for their vehicle but only get the chance to wash them weekly or every other week. Both categories of enthusiasts cringe at the very thought of taking their baby" to a car wash, otherwise known as automatic swirl factories"!
The car washing process is the number one cause of swirl marks! This can be avoided with quality car wash mitts, car wash shampoos, microfiber drying towels and a few other important tools as well as a little education. By just following the correct process you will have the know how to wash your car in a manner that gets it clean and reduces the chances of your instilling swirls in your paint.
DIRECTIONS
- Always wash your car in the shade! Why? Well simple, you don't want the water, be it the rinse water or the car wash solution, drying on the vehicle. Remember, we are trying to make your car look better than when you started! On that note, if at all possible, try to wash your car on a relatively calm day. You would be shocked at how even a slight breeze can put particulates and dirt into the air. These dust particles are attracted to the wash/rinse water on your vehicle and act like sandpaper when rubbed between the drying towel and vehicle surface. The breeze will also tend to dry your car for you and cause streaks and water spots.
- Use two buckets with a Gritguards in each bucket. One is for your car wash shampoo solution and the other is clean rinse water for your wash mitt.
- Fill a 5-gallon bucket 2/3 full with cool water. Add recommended amount of car wash shampoo to the water. Using a stiff jet of water, fill bucket to fully activate suds. Fill the second bucket with clean, water for rinsing your mitt.
- Thoroughly rinse the vehicle's surface to remove the accumulated loose dirt and grime before you begin your car wash procedure.
- Only use high quality car shampoos and wash mitts.
- When washing your vehicle remember to always go from high to low, never the opposite. Generally the dirtiest parts of your vehicle are those parts closest to the ground. Wheel wells, rocker panels and bumpers tend to have the largest accumulation of grunge and you don't want to bring that junk back onto the paint surface and risk scratching it. A trick that I use here is to load up a wash mitt with my car wash solution and wring it out over the wash surface. This acts like a pre-soak" and helps loosen surface gunk It also adds more sudsy water to my surface.
- Keep your wash areas small and rinse your mitt frequently. Don't try to wash the car in one fell swoop. (Unless it's a Smart Car of course.)
- Wash in straight, overlapping lines as opposed to circles and remember to be gentle with the wash mitt on the first pass.. This first pass picks up the initial junk, and loosens the remaining dirt and gunk for pick up on the second pass.
- Rinse your vehicle by opening up your hose nozzle or removing the nozzle if you don't have an open flow option and letting water run or sheet over the surface instead of spraying. This helps in two ways. First, generally when water has sheeted" off of a surface it tends to leave less residual droplets behind. This means less to drying time. Second, since there is less water to pick up, there is less chance of your leaving water behind to spot" the vehicle.
- When you dry your car, use only high quality microfiber waffle weave drying towels like a Cobra Guzzler Waffle Weave Drying Towel and wring out often. Gently dry the surface without much pressure. You don't need to rub the surface you're just picking up the bulk of the water! Once you have picked up the bulk of the water, and the first towel is saturated, use a second towel to lightly pick up any remaining streaks or droplets.
- Lastly, if your wax is still in good shape, go over the vehicle with a quick detail spray like the Ultima Detail Spray Plus and a plush Edgeless Microfiber Quick Detail Towel to restore a radiance and slickness to the paint. This last step will give your vehicle that just detailed" look by enhancing gloss will also remove any sneaky water spots or streaks that showed up when you weren't looking.

STEP 2 - CLAYING YOUR CAR
BLACKFIRE Poly Clay Bar quickly and easily removes most forms of paint contamination that is not removed with your normal car wash process. Pinnacle Ultra Poly Clay will remove contaminants like insects, tar, stubborn road grime, exhaust soot, oxidation, pollen, light paint overspray, factory fallout and more! Detail clay can even take care of stubborn brake dust contamination.
How do you know if detail clay is what you need? After a good wash, feel the paint's surface. Rough spots and bumps mean contaminants. The BLACKFIRE Poly Clay Bar will clean and smooth your car's paint and get that bonded grime out of the way so you are ready to polish your paint!
IMPORTANT NOTE: DO NOT use detailing clay on a dirty paint surface. Always wash your vehicle before claying.
DIRECTIONS
- Use Pinnacle Ultra Poly Clay only after thoroughly washing your car to remove loose dirt and grime.
- Flatten half of a bar of Pinnacle Ultra Poly Clay and mold into a flat clay wafer.
- Lightly mist the clay bar and a 2' by 2' area of the surface to be cleaned with the Pinnacle Clay Lubricant.
- Gently glide the wafer of Pinnacle Ultra Poly Clay on the surface in a back and forth motion until contamination is gone.
- Fold the clay bar in half and re-flatten frequently to expose a fresh cleaning surface.
IMPORTANT! Discard clay if dropped or when a clean surface can no longer be exposed.
NOTE: This clay is soft and should not be used on hot surfaces or when the air temperature is above 84 degrees. In extreme summer weather, use during early morning hours. High humidity conditions may make the bar sticky and difficult to use.
STEP 3 - POLISHING YOUR CAR'S PAINT
You know how you want your vehicle to look but you must also take in to consideration the time involved, tools needed and, if the damage is severe, your own skill level.
Here are a few things you need to think about before you start your surface evaluation process.
- Products and Tools Available
- Time Available
- Work Space Including Lighting
- Weather Conditions
- Skill Level
- Your Expectations
Now that we know what we have to work with, let's evaluate the surface of your paint to determine our plan of attack.
- Overall Paint Condition Is your paint new or like new, in need of light polishing for gloss enhancement, requiring minor defect removal or is your paint neglected and needing heavy defect removal?
- Paint Hardness This is difficult to tell until you start polishing your car. Some paints are harder than others making defect removal more difficult so more aggressive products would be needed.
- Paint Thickness This is difficult to tell unless you have a paint thickness gage. Without a gage, what you need to look for is thin spots or any areas that may have been burnt through in the past by inexperienced detailers with the wrong type of buffer. If you find a thin area, stay away from that area with your polisher. You can't polish out thin paint, it just wears it away.
- Isolated scratches
- Swirl
- Oxidation
- Paint etching
- Water spots
- Paint staining
- Clarity of overall surface
Now that we know what needs to be corrected we need to choose the proper polish and polishing pad to correct the defects in your paint's surface and achieve desired results.
Pinnacle Natural Brilliance Polishing System:
STEP 1- Remove serious defectsThe Yellow Light Cutting Lake Country CCS Foam Pad is the first step in serious defect removal such as random isolated scratches, heavy swirl, severe oxidation, stubborn water etching and other difficult to remove paint defects.
For the worst defects, use Pinnacle Advanced Compound, which is a true polishing compound.If the defects are not as serious, or you're not sure, start with the Orange Light Cutting Lake Country CCS Foam Pad and Pinnacle Advanced Swirl Remover. This combination works on a multitude of paint imperfections.
STEP 2- Remove light swirls and minor defectsThe White Polishing Lake Country CCS Foam Pad is the second step for minor defect removal including swirl, fine isolated scratches, water spots, mild water etching, light oxidation and other less severe paint finish defects.
Use the White Polishing Lake Country CCS Foam Pad for safe and complete removal of medium to light common defects with Pinnacle Advanced Finishing Polish.
STEP 3- Pre wax cleaning and gloss enhancementThe Green Polishing/Finishing Lake Country CCS Foam Pad is your third step in paint perfection and is used to clean your paint and enhance gloss so you can achieve that desired deep, wet looking shine.
Use the Green Polishing/Finishing Lake Country CCS Foam Pad for your final gloss enhancement as well as pre-wax cleaning to prep your surface for proper bonding of car wax, paint sealant or protectant with the Pinnacle Paintwork Cleansing Lotion.
DIRECTIONS
Remember to never work in direct sunlight or on a hot surface. Good lighting is also very important so you are able to evaluate your work during the polishing process.
- Thoroughly wash and dry your car.
- Use a detailing clay to remove bonded surface contamination that is in the way of polishing your paint.
- Choose and about a 2' by 2' area on the surface to begin your process. Usually the worst area is your best choice.
- With painter's tape, tape off any sharp edges and trim to avoid staining trim, build up in cracks and crevices and pad damage.
- Select the proper polish and polishing pad based on your surface evaluation to start your process.
- Adjust your speed setting according to the Recommended Speed Setting Guide" below.
- Place the pad on the surface of the paint.
- Turn on the power switch. WARNING! Never lift the polisher off the surface of your paint while it is turned on!
- When removing any type of defects apply medium pressure while polishing and move in SLOW overlapping motions according to the Recommended Paint Polishing Pattern Guide" below.
- When the polish is worked in well it will start to turn clear. At this point turn off the machine and lift it off the surface of the paint.
- With a clean, quality microfiber towel, buff the remaining product residue off the surface of your paint.
- In good lighting, evaluate your work. If it looks like you need to work on the defects a little more, add a few more pea size dabs of polish and repeat your process until your evaluation revels success. (Keep in mind when using more aggressive products you need to work your way down in aggressiveness to achieve your best shine.) Don't forget, this is a four-step process but you may not need all for steps.
- Working in sections that are no larger than 2' by 2' to concentrate your work repeat the necessary polishing processes over the entire surface of your car until desired results are achieved. Remember areas with more serious defects will require more polishing time so be patient and allow the polisher to do it's job.
- Using your final wax pad, apply your favorite car wax, paint sealant or paint protectant and allow to cure.
- Remove remaining residue with a clean, quality microfiber towel or buff off using your microfiber bonnets to reveal a brilliant shine!
- Maintain your shine by quick detailing when lightly dusty and regular washing as needed with a quality car wash shampoo, wash mitt and microfiber drying towel.
Proper machine polishing is as easy as following this simple pattern and concentrating your work in a 2' by 2' section at a time. Master this and you are on your way to a brilliant shine!
Recommended Paint Polishing Pattern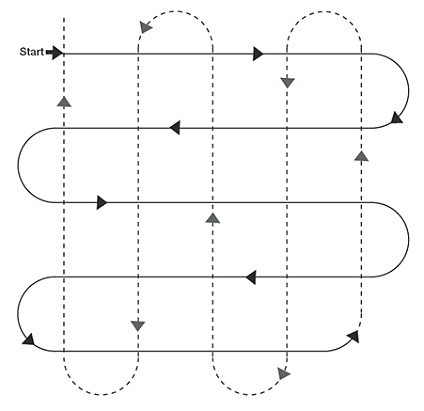
Recommended Speed Setting Guide
- STEP 1- Remove Serious Defects 5 to 5.5
- STEP 2- Remove Swirl and Minor Defects 4.5 to 5
- STEP 3- Pre Wax Cleaning and Gloss Enhancement 4.5
- STEP 4- Protect your paint finish from harsh environmental elements 2.5
- Product Residue Removal Microfiber Buffing Bonnet - 3.5 to 4
Note: Not all paint finishes require the entire four-step process. Complete only the steps necessary for the condition or your paint finish.
STEP 4 - PROTECTING YOUR CAR'S PAINT
First of all let's start with the confusion many have with the difference between waxes, protectants and sealants. Basically they all fall into the same category and while some do a much better job than others they all do the same thing and that is to enhance gloss and protect your finish. When it comes down to a traditional wax like your father or grandfather used vs. a newer synthetic protectant or sealant the newer technology has won. While the traditional wax does protect and enhance gloss the newer protectants and sealants do a much better job and last much longer. What it comes down to is man perfected the wax!
STEP 4- Pinnacle Liquid Souveran Wax Protect your paint finish from harsh environmental elementsThe charcoal Gray Finishing Lake Country CCS Foam Pad is the final step to a flawless finish and is used to safely apply your car wax, paint sealant or protectant.
Use the Gray Finishing Lake Country CCS Foam Pad for thin, even application of Pinnacle Liquid Souveran Wax.
DIRECTIONS
Remember to never work in direct sunlight or on a hot surface and make sure your surface is clean and dry.
- Apply small amount of Pinnacle Liquid Souveran Wax to your Gray Finishing Lake Country CCS Foam Pad.
- Set speed setting to 3 and spread Pinnacle Liquid Souveran very thin.
- Using a clean Gold Plush Jr. Microfiber Towel or Bonnets, buff until all residue is removed to reveal that show car shine.
- Additional layers can be applied after 1 hour.
STEP 5 - MAINTAINING YOUR CAR'S PAINT
Washing you car often can be very time consuming. For those times when your car is just a little dusty, Pinnacle Souveran Liquid Spray Wax is the solution!
DIRECTIONS
- For best results, apply to a cool surface and work on a single panel at a time.
- Just a light mist of the Pinnacle Souveran Liquid Spray Wax (hold bottle 12"-15" away from surface) and follow by a wipe with the super plush Gold Plush Jr. Microfiber Towel.
- Water spots & streaks
- Environmental paint damage
- Dust build up on paint